


 Senior Member
I was looking for a pad to use for the back of the boat. I am getting tired of people putting on their gear and hitting the back of the boat. I have little dings from wakeboards and skiis. Well any, I came across these. The websight is www.seadeck.com
I still need to find a thin long strip for the rear of the boat just above the swim deck.
Tazz 07' Moomba LSV --Kicker Marine Amps (MX700.5 & MX350.4) 6 polk DB651 speakers, 4 MB Quartz Marine Speakers, 10" Boston Acoustic Sub, Z-5 Cargo Rack, Custom Speaker/Light Bar, modified ballast system, Custom LED Rings
Live life to the extreme and no less!!
Senior Member

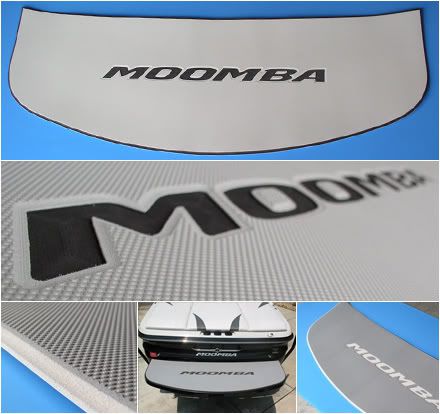
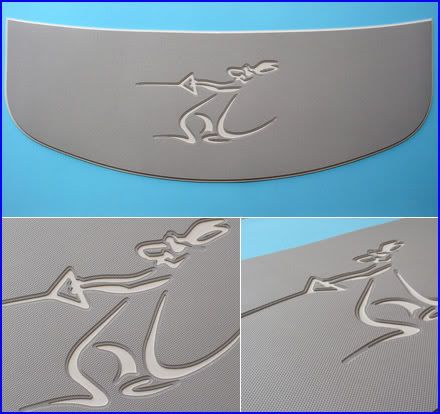
Wow I am stoked.. is that storm grey and black? I ordered that.. but I had to pay the full 220 to get the roo in a 3 piece pad. but damn tazz that looks sick... Very nice...
Senior Member
Yup that would be my boat pictured!Originally Posted by tazz3069


2007 Mobius LSV
Senior Member
Love the sea deck stuff, but we on gator grip before the sea deck thing came up, we really like it, but there is no roo on it. really prefer 1 piece over 3.
Tazz I ordered mine last week with the Roo. I am waiting with baited breath to see it and get it on the boat! Can't beat the special price!
Senior Member
Be VERY careful when applying these! Measure, place and check, check, check! Once these are down, they are down!
2007 Mobius LSV
Senior Member
Measure 20 times and past once. I like that. I want a product that I can apply and not worry about it comming off.
Tazz 07' Moomba LSV --Kicker Marine Amps (MX700.5 & MX350.4) 6 polk DB651 speakers, 4 MB Quartz Marine Speakers, 10" Boston Acoustic Sub, Z-5 Cargo Rack, Custom Speaker/Light Bar, modified ballast system, Custom LED Rings
Live life to the extreme and no less!!
I was wondering what it was going to be like. Are there any cheats that work? How hard is it to center up? Did you work from the center out? Any insight would be appreciated.
Senior Member
Sled, here's how i did it. Once i had all the glue off i used a scotchbrite pad and alcohol to remove any residue and prep for a nice surface for glue to adhere to. I did this everywhere but the last outer 1" all around so i wouldn't mar the surface at the edges.
Once the platform is prepped, lay the pad on the platform and move it around until your happy with the positioning. I had two helpers, one at each end that lightly held it in place until i was satisfied.
Then i had one hold the pad down tightly at one end and the other in the middle so it couldn't move at all. It comes with a thin paper backing attached. I lifted the other end and peeled back about 12" or so. I layed it down where the paper ended at the peel and smoothed it out with my hands as it went towards the end. Don't push to hard outwards or you'll risk stretching at as you go then it won't fit right.
Once that end was applied i had one helper start peeling the paper back towards the other end and again smoothed my way evenly until i reached the opposite end.
At this point i smoothed the whole pad again and the applied as much downward pressure as possible to really bond the glue. Then i went around all the edges and pressed those down real good. It is important to check the edges as the pad is beveled and you might miss them the first time around. That's it.
If you get a few small bubbles don't worry, try to work them out without applying to much pressure so you don't mess it up. I had two, pressed them down and they went away in the sun & heat. Once bonded and in the heat awhile i don't see how this thing could come off!
Remember, patience is the key! Good luck & enjoy it, it's a night & day difference, you'll see!
Last edited by Razzman; 08-01-2008 at 12:42 AM.
2007 Mobius LSV
Thanks Razzman. Your process made me think of some other ideas as it were. Maybe I could lay it out 1st and use some marks for alignment using tape or a crayon or something like that. Do they require you to use a scotch brite pad or was that your idea?
 Posting Permissions

 Reply With Quote