Member
Just thought I'd post a few pictures of my ongoing stereo upgrade.
Here is the end goal, which should be done by this Friday (once all the goodies arrive in the mail).
I'm mounting the amps behind the passenger seat, against the inside of the hull. To do this, I first made a pattern for my amp rack out of cardboard. I then positioned it against the hull and marked 4 points that will secure the amp rack. I chopped down some 2x4's and installed bolts to use as mounting posts.
I then traced the outline of the 2x4 mounting plates onto the carpet.
I used a blade to cut the carpet so I could glue the mounting plates to the fiberglass.
Then used some epoxy and a lot of shoulder-cramping arm-deadening force to hold it in place while it set up. Here is the end result.
Note that if the surface is not totally flat, you should contour the back of the 2x4 block to match. This will ensure a good bond.
Here is my first version of the amp rack, two Fosgate amps.
I've decided to upgrade these to Phoenix Gold Octane R amps. A 5ch 900w amp to drive the in-cabin speakers and single 10" sub. Then a 4ch 800w amp for the tower speakers.
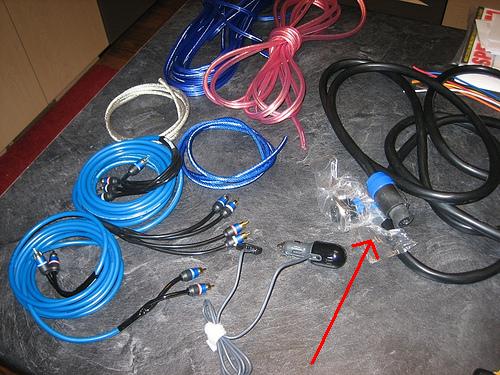
I'm wiring the boat will all Monster Cable interconnects, speaker wire, and power cable. I decided to pre-cut and tape all the cables together to simplify the wiring. Here's some of the materials.
After measuring and cutting the speaker wire, and adding a few lines of smaller-gauge wire for control signals, I taped it all together with some good 3M electrical tape.
I then ran the cabling around the hull, securing it to the underside of the gunwale using pre-existing mounting straps and cable ties. You might want to wrap your arms in rags, or wear a long sleeve shirt, or you'll have rashy arms for days!!
I also added a Optima yellow-top to the system. I found some great pre-made battery cables at the local auto store. They come in various lengths and make the install painless. I've set up the dual-batteries on a Perko switch. Using the same techniques as above, I made a backing plate for the switch and epoxied it to the sidewall behind the passenger seating.
That's it for now ... more to come.
07 Supra 21v
Senior Member

Wow, very detailed.
The chart/diagram...did you do that yourself or did that come from a website? Just curious if there is somewhere online that advises how to divide up amps, speakers.....
You should have a great sound when complete!
Brad
2011 Launch 21V Sold... boatless replaced with a Jeep JKUR
2006 Moomba Mobius LSV sold
2004 Outback sold
Senior Member
That's phat, man.....lookin great!!!!
.
B
Member
Thanks, it sounded decent with the Fosgate amps and existing Pioneer speakers, but I want this thing to jam. I made the chart on my Mac using OmniGraffe, a great diagram-ing application.Originally Posted by 04OUTBACK
As for wiring up your speakers, it's fairly simple. All speakers have a impedance rating: 2 and 4 Ohm are the typical one.
If you wire them up in series, you add their impedance. For example, wiring two 4Ohm speakers in series yields: 4 + 4 = 8. So you would have an 8Ohm load.
If you wire them in parallel, you divide their product by their sum. So again, wiring two 4Ohm speakers in parallel yields: (4*4)/(4+4) = 2 Ohm
It's just a matter of deciding how you want to wire your speakers, then matching it up as best you can to your amp's.
Check out http://www.termpro.com/articles/spkrz.html for the math. JL Audio's site has some good tutorials for wiring up your subs at http://mobile.jlaudio.com/support_pages.php?page_id=145
07 Supra 21v
Senior Member
Great Thanks for the info
Brad
2011 Launch 21V Sold... boatless replaced with a Jeep JKUR
2006 Moomba Mobius LSV sold
2004 Outback sold
Senior Member
Burke,
Anyone with a 2 gauge cable with Speakeron connectors just lying around on their bench is a friend of mine! What PA do you use ?
-J
Senior Member
I read the article series/parallel. Very interesting reading. But confirmed that using a combination of the two on my system was the best method for my setup.
.
Good to hear from another source.
.
Thanks
.
B
Member
No PA. The harness is what my local shop recommended to wire up the tower speakers. I have yet to start that process, drilling through my gunwale and into my tower is a bit crazy. Maybe after a beer or two I'll dive right in and finally get it done.
07 Supra 21v
Member
Hey Burke,
I added a 6 channel amp to my system a couple of years back. I mounted it almost identically to you. Great minds think alike I guess. I used 4 hardwood blocks though. And then wood screws into those. Instead of bolt posts coming out. Though, thinking about it now, your method is probably nicer. It's a bit of a bear getting in there and racheting down those screws in really cramped quarters.
I originally attached mine with Liquid Nails. Not a good choice apparently. My top 2 blocks detached last weekend. Though I suspect it was from pulling a slalom skiier at ~34 in a bit of rough water. I also didn't apply enough clamping force the first time. This go round, I used Gorilla Glue. We'll see how long that lasts. Just ordered a set of MMC650s to replace my stock interior speakers too. Already have a Kappa Perfect 10" sub.
See you on the lake,
Derek
Senior Member
DeeLuk -
Forget the crappy glues and bonders... GET EPOXY. It is what the boat is made from and is the best thing to adhere to fiberglass.
Burke -
OK, What the hell is this then ?
-J
 Posting Permissions


 Reply With Quote