


 Senior Member
I've read several threads here about the topic and wanted to contribute back to the community my experiences. This will serve as a 'that was neat to read' picture thread as well as a rough DIY manual for those interested. Feel free to ask questions if I left out a detail. Enjoy!
Shopping list (admins, delete links if not allowed):
Slide - $78
https://www.amazon.com/gp/product/B0...?ie=UTF8&psc=1
Locking Swivel - $23
https://www.amazon.com/gp/product/B0...?ie=UTF8&psc=1
Aluminum Plate - $20
https://www.amazon.com/gp/product/B0...?ie=UTF8&psc=1
Hardware - $40 (Local Tractor Supply)
- 4x 5/16-18x1.5" (Slide to Floor)
- 4x 5/16-18 Nyloc Nut (Slide to Floor)
- 4x 5/16-18 Fender Washer (Slide to Floor)
- 4x 5/16-18 Washer (Slide to Floor)
- 4x 1/4-20x0.75" (Slide to Swivel)
- 4x 1/4-20x1.5" (Slide to Swivel)
- 8x 1/4-20 Washer (Slide to Swivel)
- 4x 1/4-20 Nyloc Nut (Slide to Swivel)
- 8x 5/16x1x1/2" Nylon Spacer (Slide to Swivel/Swivel to Seat Plate)
- 4x 5/16-18x1.5" (Swivel Plate to Seat)
- 4x 5/16-18 Washer (Swivel Plate to Seat)
- 4x 5/16-18 Split Lock Washer (Swivel Plate to Seat)
- 4x 5/16-18 Nut (Swivel Plate to Seat)
Preparation:
This is the reason I started this project. Aside from the obvious fear of Tetanus, my wife did not enjoy trying to drive a new boat at surf speed, with surf ballast, with the seat all the way back. It's the little things apparently...
Remove the floor. There are several stainless phillips head screws around the perimeter of the floor that you can see from the cabin, along with several inside the perimeter lockers that are threaded into the end grain of the floor. I will note, the floor is freakishly heavy. Especially when you don't have a floor to stand on anymore. That is my warning, remember, I told you so...
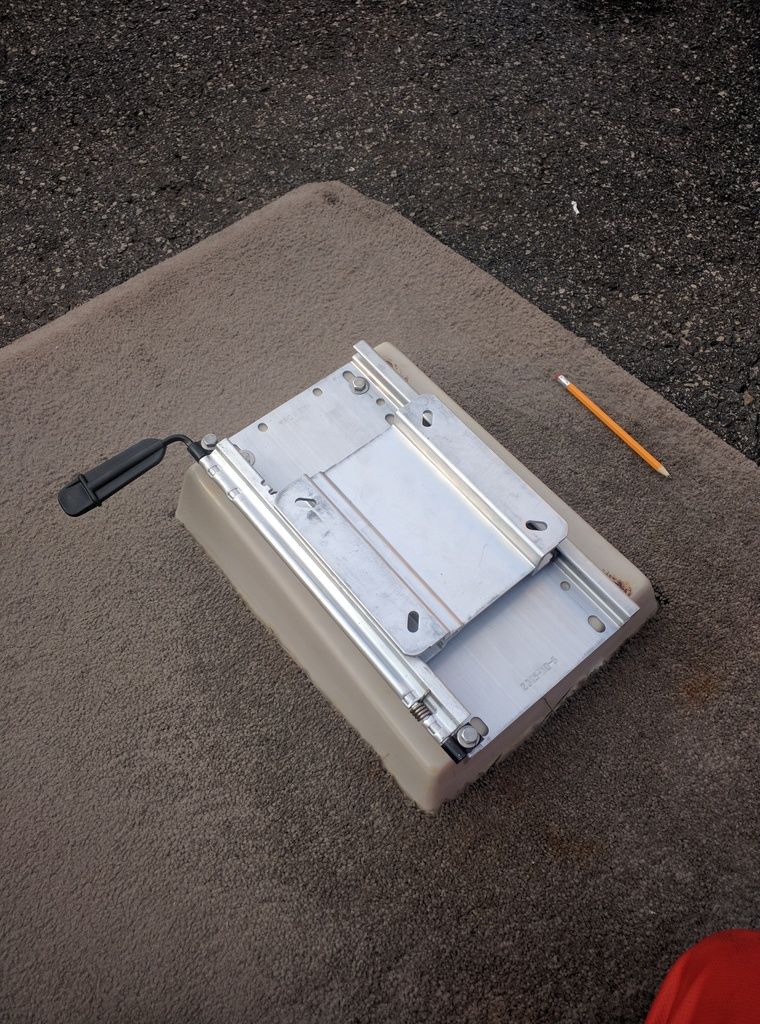
I cleaned up the rust stains in the floor seat pedestal by wet sanding with 1000 grit paper. I chose to mount the slide upside down from a traditional manner. Most all the slides I found online expect you to mount the smaller 4 bolt flange to a post adapter that would then mount over a cylindrical post - think center console. The LSV's seat riser had reinforcement blocks at each corner, but nothing connected and I was afraid if I mounted the smaller base downwards it would crack the fiberglass. It happened to work out perfectly dimensionally to be upside down. The only drawback is as you slide the seat forwards or back, the handle stays static to the floor - not an issue for me, I have gotten used to it immediately. The 4 5/16-18x1.5" bolts were used to bolt the slide to the floor. I centered it left and right on the fiberglass mount.

2008 OBV
325 EFI with closed cooling
Gravity III with 750's in the rear, 400 stock floor, 750 IBS
Servo valve ballast upgrade
Wetsounds Rev10
JL Amps, WS420BT
2000 Outback LS <-- Sold!!!
310 Carb Direct Drive
800# Rear Locker
750# IBS (should have kept this for the OBV)
Dual Batteries with 2 Bank Charger System
Kenwood Head with Remotes
Too many hours restoring exterior from prior negligence to count!
Senior Member
Next the locking swivel went on. The LSV has a sloped fiberglass mount to tip the seat back for your driving pleasure, I would encourage not to mess with your driving pleasure, after all, that's the point of having a boat like this right?? The nylon spacers worked well for this application - 1) they will not rust/corrode/incur galvanic action, 2) they are very easy to modify to shape. The 1/4-20x0.75" hardware was used on the front two mount holes and the longer 1.5" with two spacers on each side were used in the rear two mounting holes. The top spacer on each side was ground to an angle to match the mating swivel plate. (see next two pictures). I used Nyloc nuts here simply because I didn't want vibrations to loosen over time, especially the front two bolts since the slide and swivel do not meet flat together and space was at a premium to not interfere with the slide mechanism.
Now the fun part. Pick the heavy floor back up, lift into the boat, and reinstall without damaging precious vinyl. Have I mentioned yet that the floor is heavy? Once the floor was in place again, I switched to mounting the aluminum plate to the bottom of the seat. I was sweating the detail of whether or not the seat would be able to swivel without hitting the outside starboard wall, well actually I was sweating from the 97* NC heat, but concerned about the space requirement too.
The seat plate was pretty straight forward, I re drilled the two front seat holes about 1-1.5" further aft to fit the 12"x12" plate, plenty of stock in the seat to do that. Four 5/16" bolts, larger fender washers to distribute load, lock washers, and nuts - you get the idea. At this point, referencing how everything was mounted before, I assumed the seat would have to move towards the center line of the boat if it had to go anywhere, so I offset the aluminum plate towards the starboard side thus giving me more maneuvering room later in the assembly process.
Now, back to sweating... the position of the seat on the swivel. Yeah OK, the NC heat too. I basically lifted the seat into position and tested it at 0* and 90* and once I was happy, traced the outline of the swivel on the aluminum plate. Here is the finished product, minus the seat.

2008 OBV
325 EFI with closed cooling
Gravity III with 750's in the rear, 400 stock floor, 750 IBS
Servo valve ballast upgrade
Wetsounds Rev10
JL Amps, WS420BT
2000 Outback LS <-- Sold!!!
310 Carb Direct Drive
800# Rear Locker
750# IBS (should have kept this for the OBV)
Dual Batteries with 2 Bank Charger System
Kenwood Head with Remotes
Too many hours restoring exterior from prior negligence to count!
Senior Member
Overall I am extremely happy with the install. I have roughly 5" of front to back travel and 90* of rotation. To get more rotation I could have moved the plate farther forward on the swivel to get it away from the throttle wall when rotated, however, at 6' 2" I wanted as much leg room as I could manage which encouraged me to mount the seat all the way back on the swivel as much as I could stand. The only reason I would consider changing it would be to be able to turn around 180* and put my feet up on the starboard seat during lounging time. The back of the seat touches the window trim just barely at 90*, but has to be slid all the way back to get there in order to miss the throttle. I was planning on leaving 1/4" gap but forgot about the tilting back (remember? don't mess with your driving pleasure) so when I added the spacers back in the mix, it kicked the seat back a bit more than I expected. Here are some pictures to show the seat positions and clearances.
Almost forgot, it did add height - no way around that. I did not measure it, however, I would say it added between 2-3" overall. Driving before I used to look under the windshield frame for the most part, now I definitely look over it. It's less than if I had the seat bolster in the up position. This mod has all but eliminated the seat bolster need for me, my wife may still use it though.
All the way forward:
All the way back:
45*:
90*:

Last edited by aerolland; 07-28-2016 at 04:38 PM. Reason: Added detail
2008 OBV
325 EFI with closed cooling
Gravity III with 750's in the rear, 400 stock floor, 750 IBS
Servo valve ballast upgrade
Wetsounds Rev10
JL Amps, WS420BT
2000 Outback LS <-- Sold!!!
310 Carb Direct Drive
800# Rear Locker
750# IBS (should have kept this for the OBV)
Dual Batteries with 2 Bank Charger System
Kenwood Head with Remotes
Too many hours restoring exterior from prior negligence to count!
Senior Member
Clearance to throttle:
Just touching at 90* rotation:

2008 OBV
325 EFI with closed cooling
Gravity III with 750's in the rear, 400 stock floor, 750 IBS
Servo valve ballast upgrade
Wetsounds Rev10
JL Amps, WS420BT
2000 Outback LS <-- Sold!!!
310 Carb Direct Drive
800# Rear Locker
750# IBS (should have kept this for the OBV)
Dual Batteries with 2 Bank Charger System
Kenwood Head with Remotes
Too many hours restoring exterior from prior negligence to count!
Senior Member
aerolland - Nicely done! Both the modification and how you posted it here with pics and explanation. Congrats on a successful project and thanks for sharing. - Deerfield
2007 Outback - SOLD June 2016
2012 RAM Crew Cab
2015 Subaru Forester
Stuart
"When you first start out with something new, you're always a little uptight." - Don Rickles
Senior Member
Great job all the way around.
Sent from my iPhone using Tapatalk
2008 Moomba Outback DD resurrection
Senior Member
Dam....I'm jealous. Great jobOriginally Posted by aerolland

2011 Mobius LSV, V2 Tower, 1100lbs regular side,
750lbs goofy, 370lbs ski locker, 750lbs bow,
flow surf (don't use it thanks to suck gate)
Junior Member
Photos not loading. any suggestions
Senior Member
I think I messed everything up with my folder modifications in Photobucket. I'm out of town until Tuesday, once I get back in front of a PC I'll fix it
Sent from my Nexus 6 using Tapatalk
2008 OBV
325 EFI with closed cooling
Gravity III with 750's in the rear, 400 stock floor, 750 IBS
Servo valve ballast upgrade
Wetsounds Rev10
JL Amps, WS420BT
2000 Outback LS <-- Sold!!!
310 Carb Direct Drive
800# Rear Locker
750# IBS (should have kept this for the OBV)
Dual Batteries with 2 Bank Charger System
Kenwood Head with Remotes
Too many hours restoring exterior from prior negligence to count!
Senior Member
OK so the editing window has elapsed so I cannot edit the original post (or I simply don't know how...) so I will copy and paste with the new links below:
I've read several threads here about the topic and wanted to contribute back to the community my experiences. This will serve as a 'that was neat to read' picture thread as well as a rough DIY manual for those interested. Feel free to ask questions if I left out a detail. Enjoy!
Shopping list (admins, delete links if not allowed):
Slide - $78
https://www.amazon.com/gp/product/B0...?ie=UTF8&psc=1
Locking Swivel - $23
https://www.amazon.com/gp/product/B0...?ie=UTF8&psc=1
Aluminum Plate - $20
https://www.amazon.com/gp/product/B0...?ie=UTF8&psc=1
Hardware - $40 (Local Tractor Supply)
4x 5/16-18x1.5" (Slide to Floor)
4x 5/16-18 Nyloc Nut (Slide to Floor)
4x 5/16-18 Fender Washer (Slide to Floor)
4x 5/16-18 Washer (Slide to Floor)
4x 1/4-20x0.75" (Slide to Swivel)
4x 1/4-20x1.5" (Slide to Swivel)
8x 1/4-20 Washer (Slide to Swivel)
4x 1/4-20 Nyloc Nut (Slide to Swivel)
8x 5/16x1x1/2" Nylon Spacer (Slide to Swivel/Swivel to Seat Plate)
4x 5/16-18x1.5" (Swivel Plate to Seat)
4x 5/16-18 Washer (Swivel Plate to Seat)
4x 5/16-18 Split Lock Washer (Swivel Plate to Seat)
4x 5/16-18 Nut (Swivel Plate to Seat)
Preparation:
This is the reason I started this project. Aside from the obvious fear of Tetanus, my wife did not enjoy trying to drive a new boat at surf speed, with surf ballast, with the seat all the way back. It's the little things apparently...
Remove the floor. There are several stainless phillips head screws around the perimeter of the floor that you can see from the cabin, along with several inside the perimeter lockers that are threaded into the end grain of the floor. I will note, the floor is freakishly heavy. Especially when you don't have a floor to stand on anymore. That is my warning, remember, I told you so...
I cleaned up the rust stains in the floor seat pedestal by wet sanding with 1000 grit paper. I chose to mount the slide upside down from a traditional manner. Most all the slides I found online expect you to mount the smaller 4 bolt flange to a post adapter that would then mount over a cylindrical post - think center console. The LSV's seat riser had reinforcement blocks at each corner, but nothing connected and I was afraid if I mounted the smaller base downwards it would crack the fiberglass. It happened to work out perfectly dimensionally to be upside down. The only drawback is as you slide the seat forwards or back, the handle stays static to the floor - not an issue for me, I have gotten used to it immediately. The 4 5/16-18x1.5" bolts were used to bolt the slide to the floor. I centered it left and right on the fiberglass mount.
2008 OBV
325 EFI with closed cooling
Gravity III with 750's in the rear, 400 stock floor, 750 IBS
Servo valve ballast upgrade
Wetsounds Rev10
JL Amps, WS420BT
2000 Outback LS <-- Sold!!!
310 Carb Direct Drive
800# Rear Locker
750# IBS (should have kept this for the OBV)
Dual Batteries with 2 Bank Charger System
Kenwood Head with Remotes
Too many hours restoring exterior from prior negligence to count!
 Posting Permissions


 Reply With Quote


