Super Moderator

Before you start this project id reccomend you have nerves of steel and stones to back those up. This was the hardest project ive done and took me about 3 hours.
Step 1. Remove the single screw on the back of the factory bow light.
Step 2. Remove the chrome cover with a flat head screw driver.
Step 3. Remove the mounting screw from the back of the bow light.
Step 4. Twist the Red/Green lens to take it off.
Step 5. Remove the screw under the colored lens.
Now you have a 1 inch hole in the boat, remove the 2 wires on the light and your done with removal.
Now the easy part.
Tape the entire nose of your boat with Blue painters tape. Use at least 3 layers. I used 5 layers as this will help do 3 things.
1. Serves as a drawing board for your template.
2. Protects the gell coat from your tools while working.
3. Helps prevent gell coat chipping while cutting.
After you got the nose all taped, use the supplied Template and draw your new hole you need to cut.
You need to center this and measure a lot to make sure its all centered on the nose of the boat. I ran 2 peaces of tape from the front of the nose back so i have a center line to the front of the boat. Then i measured several times to find a center point to apply my template.
After the tape is down and the template is drawn comes the fun.
I used an oscillating saw, jig saw and a half moon file.
I cut my ruff square out with the oscillating saw and then used a Jig saw to cut the round top and bottom sections.
You can use a jig saw for the entire hole but i just didnt want to put that kind of pressure on the gell coat so i only used it for the edging of the round top and bottom.
After this i used a half moon file. It is shaped like half a moon on one side and flat on the other. I used this to grind the edges to the template so they were perfect.
After that i removed all the Blue tape and test fitted it all. Perfect snug fit.
Now i just connect my wires, add 3 stainless steel screws < not included >
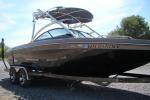
All set. I still have to pick up some screws and as you can see the front of the boat needs a good cleaning now.
Last edited by mmandley; 02-10-2010 at 08:53 PM.
Malo <--- Means--Evil or Mean One. This explains a lot.
2013 Mojo 2.5 Skylon Tower. Bestia < Beast >
[COLOR="#696969"]
Super Moderator
This is how the light looks while in motion.
This is the same style light Supra has.
Malo <--- Means--Evil or Mean One. This explains a lot.
2013 Mojo 2.5 Skylon Tower. Bestia < Beast >
[COLOR="#696969"]
Senior Member
Don't forget the screws!
Nice job brutha!
PWI as usual...
Senior Member
Mike, Looks like the hole is not center. J/k Look great. Guess you are now a pro. How many beers did it take before you cut into your baby? Or how many after it was done.
2008 Outback V - Sold but never forgotten.
Do not wait; the time will never be just right. Start where you stand, and work with whatever tools you may have at your command, and better tools will be found as you go along." -Napoleon Hill
Senior Member
Yup, same one i put on two years ago almost now, made by Aqua Signal. Nice job!
I also chronicled the install along with some questions. Mike, as long as you use the proper blade there's no issue with a jig saw on the gel. Here's a link to my install as well; Razzman's Install
Last edited by Razzman; 02-10-2010 at 09:25 PM.
2007 Mobius LSV
Super Moderator
Let me tell ya, This wasn't the first time i cut or drilled so it was a little easier. My biggest concern was not to over do it. Once i was close i used the file for almost an hour to get it perfect. I didn't want to risk the saw when i was right on the edge.Originally Posted by jester

< pishh > < slurp > well needed after all that stressful work lol.
As for being a pro, if you want one id be happy to help ya do the install. Its not to bad actually. Looks really sweet when done though.
Malo <--- Means--Evil or Mean One. This explains a lot.
2013 Mojo 2.5 Skylon Tower. Bestia < Beast >
[COLOR="#696969"]
Super Moderator
Yup i used yours as a guide as a matter a fact, forgot about the wire harness, but made it threw just fine.
Malo <--- Means--Evil or Mean One. This explains a lot.
2013 Mojo 2.5 Skylon Tower. Bestia < Beast >
[COLOR="#696969"]
Senior Member
i've been wanting to do this for awhile, but am too big of a wuss since i'd probably eff it up ..looks great!
Senior Member
Yeah i can't figure out why they screwed that blasted harness right where they did!
The other thing was why no bow access behind the cushion! Made it a royal pain to do!
2007 Mobius LSV
Senior Member
Razz, I remember look at your when you first did it and thining that is what i really want to do. Took a step back and went I did not have the stones at the time to drill my baby. Now i am checking again but do not think i have them yet. I really do like the bow light that flips up. Such a nice look.
2008 Outback V - Sold but never forgotten.
Do not wait; the time will never be just right. Start where you stand, and work with whatever tools you may have at your command, and better tools will be found as you go along." -Napoleon Hill
 Posting Permissions

 Reply With Quote